Virtualization on MacBook M1/M2 (ARM64)
Step-by-Step Guide for DevOps on Apple Silicon with Vagrant and QEMU
For most local development workflows, Docker, is often the preferred tooling, but there sometimes are need to run a full virtual machine, ideally with popular tooling like Vagrant, which can manage virtual machines, connectivity, as well as provisioning the system with scripts or a tool like Ansible.
On new Macbooks M1/M2/M3, that comes with arm64 processor, this is not so straightforward. This article covers a few quick steps where you can use QEMU to run virtual machines with either arm64 virtual machines using Apple’s hypervisor, or use a emulator to run amd64 virtual machines.
Requirements
- Operating System: macOS 12.6.3 or higher
- Hardware: Apple M1 or newer generation
- Software: Homebrew for installing packages
Tools Installed
- QEMU 8.2.1
- Vagrant 2.4.1
- Vagrant
vagrant-qemuplugin 0.3.5
Installation
The initial steps will be to get the virtual machine solution (QEMU) and install Vagrant with the QEMU plugin:
# install VM solution
brew install qemu

# install Vagrant with QEMU support
brew install --cask vagrant
vagrant plugin install vagrant-qemu
Configure and Launch arm64 image
Afterward, set up a Vagrant configuration file, download the VM image, start the virtual machine, and log into the VM.
# create configuration file for arm64 vm image
cat <<EOF > Vagrantfile
Vagrant.configure("2") do |config|
  config.vm.box = "perk/ubuntu-2204-arm64"
  config.vm.provider "qemu" do |qe|
    qe.ssh_port = "50022" # change ssh port as needed
  end
end
EOF

# download and startup VM using hvf
vagrant up --provider=qemu

# log into the VM
vagrant ssh
📓NOTE: The default ssh port is 50022 for all virtual machines, even ones that are not actively running. Thus you may need to adjust the port to avoid port collisions. You can run lsof -nP -iTCP:50022 to investigate in anything is locking the port.
This will use virtualization with the the native hypervisor built into the macOS.
Testing the virtual machine (arm64)
Once inside you can install inxi and neofetch:
sudo apt-get update
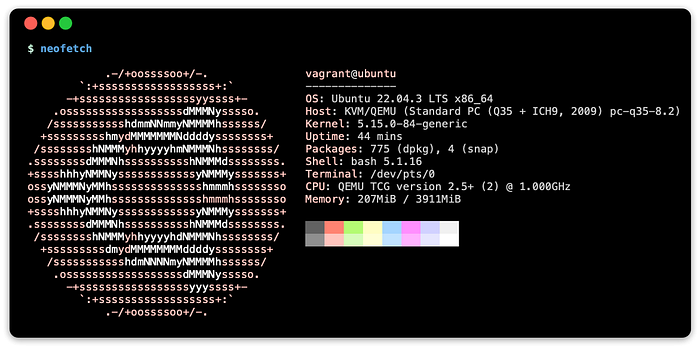
sudo apt install -y inxi neofetchThen test with using neofetch:

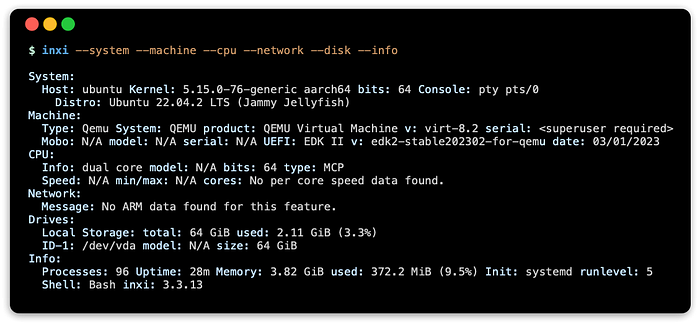
And test the environment by running with inxi by typing:
inxi --system --machine -- cpu -- network --disk --infoYou should see something like this:

Configure and Launch x86 image
The default settings for vagrant-qemu plugin will not work for running Intel based images, so we’ll have to make some adjustments to the Vagrant configuration (Vagrantfile).
Run this in a separate directory to keep configurations for amd64 and arm64 separated.
📓 NOTE: If you are using the same directory, you’ll need to run vagrant destroy to clean up the previous virtual machine.
cat <<EOF > Vagrantfile
Vagrant.configure("2") do |config|
  config.vm.box = "generic/ubuntu2204"
  config.vm.provider "qemu" do |qe|
    qe.arch = "x86_64"
    qe.machine = "q35"
    qe.cpu = "max"
    qe.net_device = "virtio-net-pci"
    qe.ssh_port = "50023"
  end
end
EOF

# download and startup VM using q35 emulator
vagrant up --provider=qemu

# log into the VM
vagrant ssh
Here’s is a break down of some of the setting changes:
arch: specifyx86_64(intel) to run amd64 images.machine: default isvirt,accel=hvf,highmem=on, which uses built-in hypervisor on the macOS. Forx64_64, we’ll need to use the emulator, so useq35.cpu: default ishome, change this tomax.- net_device: the default
virtio-net-devicewill not work as there is novirtio-buswith the emulator. Change this tovirtio-net-pci. ssh_port: the default is50022, so we need to change to another port. Runlsof -nP -iTCP:50022to see the if the port is in use.
Testing with the emulator (x86_64)
Once inside you can install inxi and neofetch:
sudo apt-get update
sudo apt install -y inxi neofetch
Then test with using neofetch:
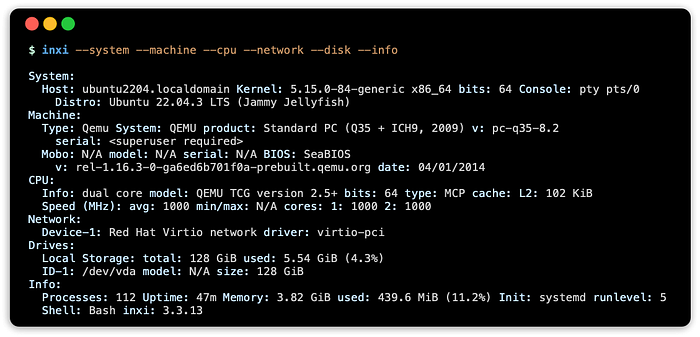
And test the environment by running with inxi by typing:
inxi --system --machine -- cpu -- network --disk --infoYou should see something like this:
Update: Limitations
I recently learned, as of May 2024, that port forwarding does not currently function due to vagrant-qemu issue 40. This feature is needed if you wish interact with the application running on the virtual guest. For example, if you are running a web application that is accessible on port 8080, you would use port forwarding to make this port accessible from the host.
From what I can gather, the current QEMU tools require elevated privileges in order to facilitate port forwarding functionality (see QEMU issue 1364). There’s a required entitlement, which is “a right or privilege that grants an executable particular capabilities”), to be able use such networking features (specially the com.apple.vm.networking API) without the need for privilege escalation. The UTM project, as an example, which also uses QEMU tools, has registered to use an entitlement for this library.
In this vagrant-qemu issue 40, there was mention socket_vmnet from the LIMA project. This facility will provide vmnet.framework support for QEMU. The service will itself have to run as root, but the QEMU tools will not require running as root.
It looks like the current direction is to wait and see what QEMU project does, as they are actively looking into this with QEMU issue 1364. Once QEMU team implements a solution, vagrant-qemu can be updated to support it. If this doesn’t happen, then maybe the socket_vmnet solution could be looked at as an alternative.
In the mean time, you may have to use the QEMU tools directly to setup the necessary infrastructure required for port forwarding, and then setup port forwarding.
Resources
Articles
These are articles that I have come across when researching this.
- ARM64 VM on macOS with libvirt + QEMU by 박윤식 (Yun-shik Park) on December 9, 2021. Shows how to use qemu-img to create qcow image, VNC client, and virsh.
- Vagrant QEMU on Apple Silicon
- ARM64 VM on macOS with libvirt + QEMU
Gists
Small code snippets or mini-articles created by authors that got off the ground with QEMU on Apple Macbook M1.
- Linux Virtual Machines with Private Network on an Apple M1 Device by David Andreoletti.
- Running Linux and Windows on M1 with QEMU by citruz and last updated on June 1, 2022.
- How to run Windows 10 on ARM or Ubuntu for ARM64 in QEMU on Apple Silicon Mac by Yoshimasa Niwa and last updated on October 2, 2021.
Vagrant Box Images
- Vagrant Box generic/ubuntu2204 (intel only)
- https://app.vagrantup.com/perk/boxes/ubuntu-2204-arm64 (arm64)
- https://app.vagrantup.com/ppggff/boxes/centos-7-aarch64-2009-4K (arm64, used for testing)
Other
- Vagrantfile — Vagrant + Ubuntu + QEMU provider tested in MacOs M1 ARM64 by eduardomp (Eduardo Medeiros Pereira) on June 18, 2023. Content looks invalid, but interested readers have added corrections to help fix it.
- vagrant-xhyve: works with xhyve or hyperkit on Intel_x86, so maybe it might work on arm64.
- Creating a Ubuntu Desktop 18.04 Virtual Machine on macOS with QEMU: Covers Macbook (intel) steps to use QEMU to run Ubuntu OS.
- Windows Insider Preview Downloads for ARM64. Note that this requires registered with Windows Insider program.
Related Articles
Vagrant with Macbook (intel)
This is a combination and how-to and survey of operating systems launched with Vagrant using Virtualbox.
Conclusion
That’s all there is to this. The tool QEMU has been around for a long time, and supports a variety of emulators for different processors and supports native virtualization. On macOS, virtualization default is Hypervisor Framework (hvf), and on Linux, KVM is supported. The QEMU tool has always been common tool to manage both emulators and a variety of virtualization solutions.
For those not familiar with Vagrant, this is a tool that manages virtual machines through a single intuitive interface command-line interface and configuration file called Vagrantfile. Vagrant also automates connections to the virtual machine, such as ssh, and provisioning the virtual machine using scripts, change configuration such as Ansible, or containers with tools like Docker.
The plugin for Vagrant vagrant-qemu is a wrapper for the qemu command line tool. With this, you can download images that support qemu from https://app.vagrantup.com.