Vagrant with Macbook (intel)
Managing VMs with Vagrant + Virtualbox on intel Macbooks
The majority of the DevOps toolchain relies heavily on Intel architecture, particularly virtual machine solutions. Among these, VirtualBox stands out as a popular choice, having been around since 2007 and compatible with Windows, macOS, Linux, and even Solaris. Vagrant, a widely-used tool for testing configuration changes and provisioning solutions, defaults to VirtualBox. In this article, I’ll provide a concise tutorial on using Vagrant with VirtualBox to experiment with various operating systems.
📓 NOTE: Vagrant with VirtualBox is compatible with macOS systems only when they are based on Intel architecture. Therefore, it won’t function on macOS systems powered by ARM64-based Apple M-series processors. However, you can explore an early experimental preview available from VirtualBox test builds for potential compatibility in the future.
1. Requirements
- Operating System: macOS 12.2 or higher
- Hardware: Apple Macbook (intel)
- Software: Homebrew for installing packages
1.1 Tools Installed
- VirtualBox 7.0
- Vagrant 2.4.1
1.2 Installation
With Homebrew installed, you can install the required components with the following command:
brew install virtualbox vagrant1.3 Using the tools
VirtualBox includes a command-line interface (CLI) called vboxmanage, which offers robust functionality to control every aspect of creating and managing virtual guests. After creating some virtual guest systems, you can list them using the following command:
vboxmanage list vmsThis should show something like this, depending on what virtual guest systems you created:

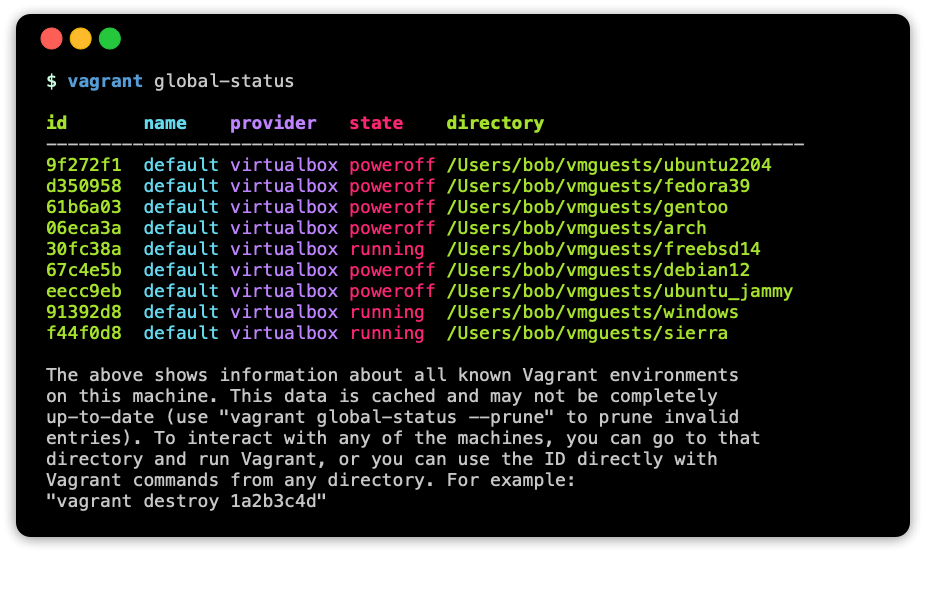
The vagrant command can display all systems created through Vagrant, whether they are virtual machine guests generated with VirtualBox or another provider. You can list the guests created by Vagrant using the command below:
The VirtualBox Manager, located at /Applications/VirtualBox.app, provides a graphical user interface where you can view virtual machine guests, adjust settings, and interact with the systems.

2. Survey of Operating Systems
Now let’s get busy and create some operating systems…
In trying out some systems, I was able to download and try out six virtual guests running: Ubuntu, Fedora, Gentoo, Arch Linux, Debian, and FreeBSD. This took about 30 minutes roughly to create all of them.
I also tried out Windows 10 Enterprise (eval) and macOS 10.2 Sierra, which obviously take longer given virtual image size approaching 20 GB.
Here are a few sample virtual guests along with instructions on how to download and install neofetch (or winfetch on Windows) to display information about the guest environment.
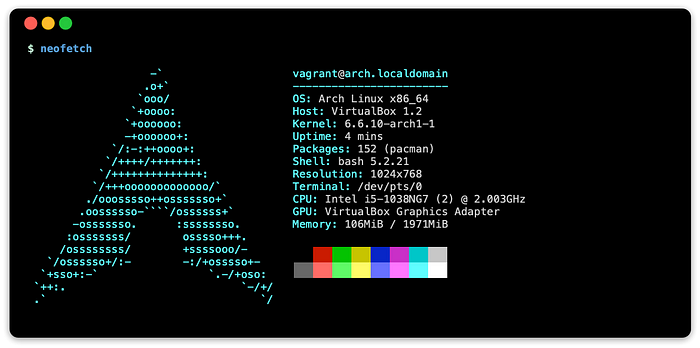
2.1 Arch Linux

To say Arch Linux is popular would be an understatement. This distro was first released in 2002 and main selling points are simplicity, minimalism, and, ahem, code elegance. Arch follows a rolling release model, which means that the software and kernel are available as soon as they are released. The documentation from ArchWiki is really something nice, with thorough explanations, how-to guides and more.
It is said that Arch Linux is one of the few distros that can help you have a better understanding of how linux works.

Arch Linux has its own package manager called Pacman and is controlled using the tool pacman, to install binary packages with an easy-to-use package build system that allows users to easily maintain their own custom build scripts, packages, and repositories.
In addition to official packages, there’s AUR (Arch User Repository) maintained by the community, typically scripts to download directly from Git code repos.
Below is how you can quickly download and run this distro in a few simple steps.
############################################
## Run on host
############################################
vagrant init generic/arch # create config
vagrant up                # download/launch vm
vagrant ssh               # login to vm

############################################
## Run on guest
############################################
sudo pacman -Syu        # optional: upgrade
sudo pacman -S neofetch # install
neofetch                # run application
The results should look something like the following:
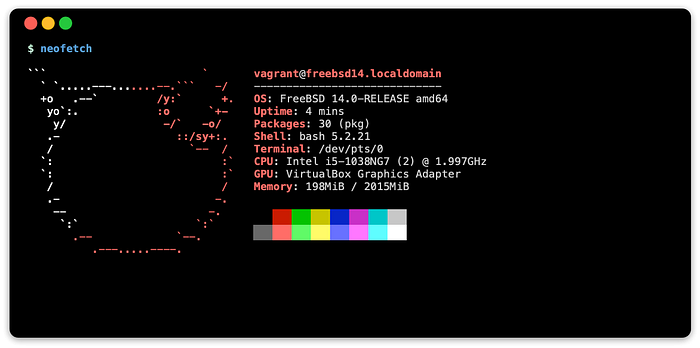
2.2 FreeBSD Unix

FreeBSD shared a common history with BSD Unix family operating system and has been in development since 1993. FreeBSD has two popular package management solutions, the Ports Collection for installing from source, and packages for installing pre-built binaries.

Below are a few commands to try out FreeBSD:
############################################
## Run on host
############################################
vagrant init generic/freebsd14 # create config
vagrant up                     # download/launch vm
vagrant ssh                    # login to vm

############################################
## Run on guest
############################################
sudo pkg install neofetch # install
neofetch                  # run application
This should show something like the following:
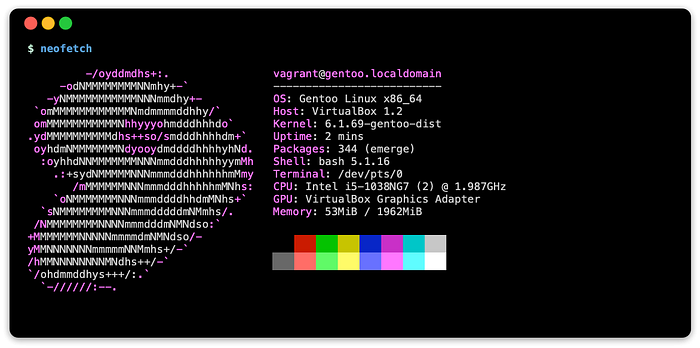
2.3 Gentoo Linux

Gentoo Linux stands out as an advanced Linux distribution allowing users to construct a highly optimized, customized Linux system tailored to their hardware. Renowned for its exceptional documentation wiki, Gentoo facilitated the intricate processes of kernel building and software compilation with intuitive guides, ensuring user success. However, the demise of this remarkable wiki in 2008, coupled with the absence of backups of this legendary wiki, led to a significant decline in Gentoo’s popularity. Nonetheless, Gentoo remains esteemed as one of the top distributions for learning Linux.
The package management system Portage uses the tool emerge to sync, build, and install packages.
Below are a few simple commands to try out Gentoo, sans the fun of compiling from scratch.
############################################
## Run on host
############################################
vagrant init generic/gentoo # create config
vagrant up                  # download/launch vm
vagrant ssh                 # login to vm

############################################
## Run on guest
############################################
sudo emerge --sync # get latest software
sudo emerge app-misc/neofetch # install
neofetch                      # run application
The results should look something like the following:
2.4 macOS

The macOS (previously known as Mac OS X) originated from NeXTSTEP, which debuted in 1989 initially designed for Motorola 68k architecture on NeXT computers.
Later, in 1993, NeXTSTEP expanded its compatibility to include Intel x86 architecture alongside the existing Motorola 68k version. Following Apple’s acquisition of NeXT Inc., Apple adopted NeXTSTEP as its new flagship operating system. The inaugural release, Mac OS X Server 1.0, debuted in 2000, tailored to operate on existing Mac hardware built on the PowerPC architecture.
Following Apple’s transition to Intel x86 processors, Mac OS X 10.4 Tiger was released in 2005, supporting both PowerPC and Intel x86 architectures. The support for PowerPC concluded in 2011 with the release of Mac OS X 10.7 Lion.
Mac OS X (or macOS), runs on a kernel (xnu kernel) that is derived from the Mach kernel and incorporates a BSD Unix environment called Darwin. This system employs a blend of BSD command-line tools and libraries, along with certain older versions of GNU tools.
📓 NOTE: Before installing any applications using either Homebrew or MacPorts, you will need to install command line developer tools. Normally this would be a single command with
xcode-select --install, but this no longer works on macOS 10.12 Sierra. It will have to be downloaded from this link below, which requires creating an Apple Developer account (free):
You try out macOS 10.12 Sierra with the following below:
############################################
## Run on host
############################################

# NOTE:
#   Download Command_Line_Tools_macOS_10.12_for_Xcode_9.1.dmg
#   to $HOME/Downloads (see https://download.developer.apple.com)
#
#   This is required to install 'neofetch' with Homebrew (or MacPorts)
#
cp ~/Downloads/Command_Line_Tools_macOS_10.12_for_Xcode_9.1.dmg .

# create config
cat << EOF > Vagrantfile
Vagrant.configure("2") do |config|
  config.vm.box = "jhcook/macos-sierra"
  config.vm.network "private_network", ip: "192.168.50.4"
  config.vm.synced_folder ".", "/vagrant", type: "nfs"
end
EOF

# download/launch vm
# NOTE: You will be prompted for administrative access in order
#       to setup file sharing with NFS
vagrant up

# login to vm
vagrant ssh

############################################
## Run on guest
## NOTE: use 'vagrant' if prompted for password
############################################

# Install Command Line Tools (compilers, libraries)
hdiutil attach /vagrant/Command_Line_Tools_macOS_10.12_for_Xcode_9.1.dmg
DMG_PATH='/Volumes/Command Line Developer Tools'
PKG_PATH="${DMG_PATH}/Command Line Tools (macOS Sierra version 10.12).pkg"
sudo installer -package "$PKG_PATH" -target /

# Install Homebrew
/bin/bash -c "$(
  curl -fsSL \
    https://raw.githubusercontent.com/Homebrew/install/HEAD/install.sh
)"

# Setup Homebrew
(echo; echo 'eval "$(/usr/local/bin/brew shellenv)"') >> ~/.bash_profile
eval "$(/usr/local/bin/brew shellenv)"

# Install neofetch
brew install neofetch

# Run neofetch
neofetch
This should show something like the following:
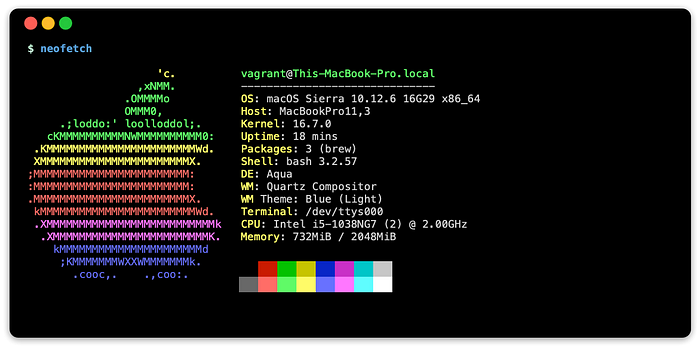
To access the graphical interface of the virtual guest macOS Sierra, you can utilize VirtualBox Manager located at /Applications/VirtualBox.app.

2.5 Windows

Originally named Windows NT, Windows was introduced in 1993. It emerged from a collaborative effort between Microsoft and IBM intended to develop the next generation of the OS/2 operating system. However, Microsoft and IBM diverged in their directions, leading to Microsoft releasing their version of the joint endeavor in 1993 as Windows NT 3.1. IBM subsequently released their iteration of the collaborative project as OS/2 Warp 3 a year later.
Windows NT should not be mistaken for the earlier 16-bit version of Windows, which operated a graphical shell atop MS-DOS. This iteration of the operating system, reliant on MS-DOS, concluded in 2000 with Windows Me (MS-DOS 8.0). Also in that same year, with the end of the 16-bit Windows, Microsoft dropped using the use of NT from the name, starting with Windows 2000 (Windows NT 5.0) and continued new versions of the operating system marketed under different product names:
- Windows XP (Windows NT 5.1) in 2001
- Windows Vista (Windows NT 6.0) in 2007
- Windows 7 (Windows NT 6.1) in 2009
- Windows 8 (Windows NT 6.2) in 2012
- Windows 10 (unknown) in 2015
- Windows 11 (unknown) in 2021
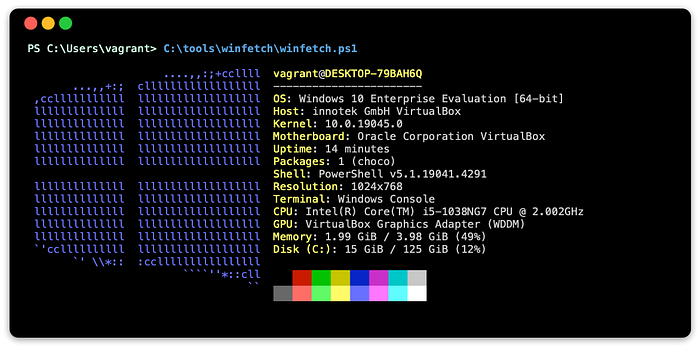
Below is how you can download and run Windows 10 Enterprise (eval):
############################################
## Run on host
############################################
vagrant init gusztavvargadr/windows-10 # create config
vagrant up                             # download/launch vm
vagrant ssh                            # login to vm

############################################
## Run on guest
############################################

# run powershell
powershell

# install chocolatey
Set-ExecutionPolicy Bypass -Scope Process -Force
[System.Net.ServicePointManager]::SecurityProtocol = `
  [System.Net.ServicePointManager]::SecurityProtocol -bor 3072
$install_script='https://community.chocolatey.org/install.ps1'
iex ((New-Object System.Net.WebClient).DownloadString($install_script))

# install/run winfetch
choco install winfetch         # install winfetch
C:\tools\winfetch\winfetch.ps1 # run script
Afterward, you should see something like this:
To access the graphical interface of the virtual guest Windows 10, you can utilize VirtualBox Manager located at /Applications/VirtualBox.app.

Final Thoughts
The primary aim of this tutorial was to showcase the straightforward process of managing virtual machines and exploring various operating systems using Hashicorp Vagrant. However, this merely scratches the surface of Vagrant’s extensive capabilities.
Building and Finding Images
Vagrant box images can be constructed using the Vagrant tool through commands like vagrant box and vagrant package. Alternatively, these images can be built using automation with Veewee or Hashicorp Packer.
There is a plethora of pre-built Vagrant box images available on Vagrant Cloud. Among the most popular options are Bento boxes from the team at Chef and Generic boxes released by Roboxes. Additionally, Vagrant.es hosts a widely followed community list of Vagrant box images.
Provisioning and Testing
In this article, I only showcased the process of downloading and running various guest operating systems. However, Vagrant offers much more than just running virtual machines; it can also provision systems by executing scripts or utilizing configuration management tools such as CFEngine, Ansible, Salt Stack, Puppet (apply or agent), and Chef (solo, zero, client, or apply), as well as container build tools like Docker or PodMan. This versatility enables rapid development and testing within these environments.
For comprehensive testing of change configuration scripts, Test Kitchen (source) is a valuable resource. It not only manages multiple virtual machine guests driven by Vagrant or another driver and provisions the systems but also acts as a test harness, automatically executing system tests using tools like InSpec, Serverspec, Auditor, TestInfra, or Bats.
Alternatives to Vagrant
Vagrant remains one of the most widely used tools for virtual machine management, but it’s not the only option available. Docker Machine, for instance, offers a plugin solution that has drivers for running various virtual machine systems, with VirtualBox as the default. This tool is used for running Docker within a virtual machine, which was required on macOS and Windows platforms. Unfortunately, Docker Machine has been archived and is no longer actively maintained. However, Mini-Kube incorporates components of Docker Machine to automate the deployment of Kubernetes.
Additionally, there’s QEMU, a popular tool for running emulators or virtual machines, although it comes with a steep learning curve. The libvirt solution provides management tools capable of overseeing KVM, Xen, QEMU, and other virtualization technologies. Plugins like vagrant-qemu and vagrant-libvirt enable the integration of Vagrant with these existing tools, expanding its capabilities beyond its traditional usage with VirtualBox.
Related Articles
Below are some related articles I wrote that may be of interest.
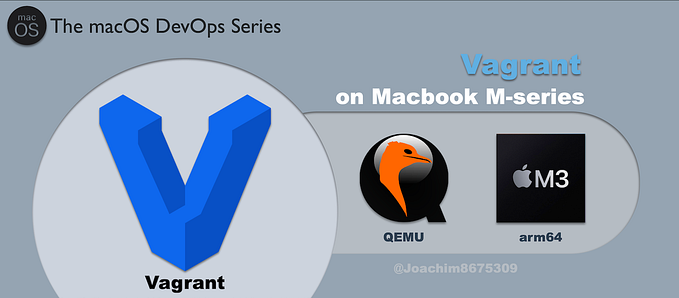
Vagrant with Macbook MX (ARM64)
This tutorial shows how to use Vagrant with QEMU to run virtual guests using Apple’s hvf (hypervisor.framework) or to run a Q35 emulator for Intel x86 guest systems on Macbook M1.
Test Kitchen with Ansible and TestInfra
Tutorial on how to use Test Kitchen with Vagrant to automate provisions several systems using Ansible and testing the results with TestInfra.
History: Origins of Mac OS X
A deeper dive into the original macOS: NeXTSTEP, and the forgotten Classic Mac OS that was simply called System. Also a little on Apple’s near acquisition of BeOS and their own micro-kernel adventures with NuKernel.
Resources
Articles
Some articles I came across regarding events around these operating systems and distros.
- Why People Are Crazy About Arch Linux? What’s so Special About it? by Abhisek Prakash on Feb 11, 2023.
- The Arch Way (Wiki)
- Why did Gentoo Linux fade into obscurity? by Jim Lynch (Infoworld) on Aug 22, 2016
- Benefits of Gentoo (wiki)
- Big News! Gentoo Linux is Now Providing Binary Packages for Quick Software Installation by Abhishek (It’s Foss News) on December 30, 2023
- Gentoo Linux Says NO to AI: Bans AI-Generated Code Submissions! by Sourav Rudra on April 18, 2023
- Technical reasons to choose FreeBSD over GNU/Linux by unixdigest on October 27, 2023
- Happy 30th, FreeBSD! Why The FreeBSD Open Source Project Has Endured by Aster Cloud on Jun 16, 2023
- FreeBSD at 30 Years: Its Secrets to Success by Marshall Kirk McKusick on June, 2023
Discussions
- FreeBSD at 30: Its secrets to success (ycombinator)
- Happy 30th FreeBSD: Why FreeBSD open source project has endured (ycombinator)
Vagrant-Packer Build Scripts
These are Packer based scripts used to build a variety of operating systems. These scripts are very instructional.
Others
- Planet Virt Tools
- Microsoft WindowsVirtual Machines: downloadable test images from Microsoft.