Installing Pythons with PyEnv
Using pyenv to manage Python 2 and Python 3 environments
Python is extremely popular these days for a variety domains. Python is popular for web programming, with famous web frameworks like Flask, Tornado, Django.
For systems and applications automation, Python is a popular general scripting language, for popular platforms like Fabric for deployments, and beyond deployment adding change configuration, Salt Stack and Ansible. Python is also popular as a build tool, such as the node-gyp tool used for many libraries and tools on the Node.js platform.
The Problem and Solution

But there comes the question, which Python? There’s two different Python languages, Python 2 and Python 3. On some systems, the command python can be python 2, and others it is python 3. And commands python2 and python3 may or may not be supported.
Within each platform, Python 2 and Python 3, your application may or may not function correctly between different versions of Python. So how do we manage all of this?
Enter PyEnv, a simple python version manager.
With pyenv command, you can install multiple versions of Python 2 and Python 3, specify, which Python platform is default for the python command, as well as have python2 and python3 commands available.
The Installation
For pyenv you need a *nix environment, such as Linux and macOS. Unfortunately, Windows is not supported. Before installing PyEnv, you’ll need to install compilers, libraries, and headers, as PyEnv will download and compile Python from source.
I wrote a previous blog on how to get compilers:
macOS installation
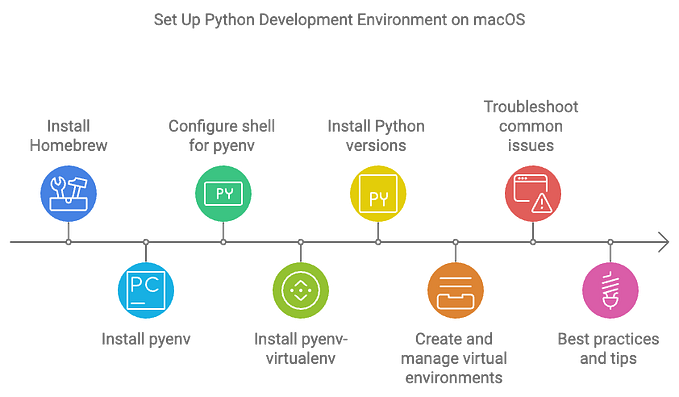
You can easily install PyEnv along with some required libraries using Homebrew:
# install pyenv
brew install readline xz pyenv pyenv-virtualenv# setup
export PATH="~/.pyenv/bin:$PATH"
eval "$(pyenv init -)"
eval "$(pyenv virtualenv-init -)"
Linux Libraries Prereq: Ubuntu and Debian
One you have the build tools installed, you need some libraries to install python:
sudo apt-get install -y \
  libbz2-dev \
  libsqlite3-dev \
  llvm \
  libncurses5-dev \
  libncursesw5-dev \
  tk-dev \
  liblzma-dev
Linux Libraries Prereq: CentOS (RHEL) and Fedora
Once have the build tools installed, you need some libraries to install python:
sudo yum install \
  zlib-devel \
  bzip2 \
  bzip2-devel \
  readline-devel \
  sqlite \
  sqlite-devel \
  openssl-devel \
  xz \
  xz-devel \
  libffi-devel
Linux installation
After installing build tools and other required libraries, you can install PyEnv using the pyenv-installer:
# install pyenv
PROJ=pyenv-installer
SCRIPT_URL=https://github.com/pyenv/$PROJ/raw/master/bin/$PROJ
curl -L $SCRIPT_URL | bash# setup
export PATH="~/.pyenv/bin:$PATH"
eval "$(pyenv init -)"
eval "$(pyenv virtualenv-init -)"
The Usage
PyEnv is install per user, where you can use these different ways:
global: default for when starting a shell for the current usershell: updates the current sessionlocal: use the local project version specified in a.python-versionfile. Python is set at the current directory level, useful for managing python per project.
Install and Default Python Versions
As an example, this installs current latest stable versions of Python 3 and Python 2, and then has defaults for Python 2 platform for python command.
pyenv install 3.7.1
pyenv install 2.7.15
pyenv global 2.7.15 3.7.1
Update Pip and Setuptools
It is good practice to update both Pip and Setuptools. For those unfamiliar with this, these are package installers, where pip is the most popular.
Setuptools uses the command line easy_install to install packages. There is no uninstall option. These packages can include Python bytecode, called egg packages, which makes packages not portable between operating systems.
Pip can both install and uninstall, and only includes source code packages, which means only scripts, no byte-code, so they are usable across different Linux distributions and operating systems.
pip install --upgrade pip setuptoolsInstalling Python packages
Now that you have the desired Python version install, we can try out some packages. Packages that have command line tools can be made available to your current python version by running pyenv rehash.
# install some tools
pip install fabric
pip install flask# make the tools available
pyenv rehash
VirtualEnv Integration
PyEnv includes a plug-in pyenv-virtualenv that includes integration with virtualenv. With this you can initialize and automatically switch into both your desired python version as well as a segregated environment for your python packages installed through pip.
I wrote an earlier blog that delves more into virtualenv.
Alternative for Windows Users
The tool pyenv is not an option for Windows users unfortunately. There are alternatives, one is the conda tool.
Conda
I experimented with MiniConda, it installs Python 2, and you can use this to install other versions of Python. It only has startup scripts for command shell with a supplied activate.bat file. So you would have to create a PowerShell equivalent for use with PowerShell.
To get started with Chocolatey installed:
choco install miniconda
cd C:\ProgramData\Miniconda2\Scripts\
activate.bat C:\ProgramData\Miniconda2
After this, you can use conda commands to create new environments with your choice of Python.
VirtualEnv Integration
PyEnv includes a plug-in pyenv-virtualenv that includes integration with virtualenv. With this you can initialize and automatically switch into both your desired python version as well as a segregated environment for your python packages installed through pip.
I wrote an earlier blog that delves more into virtualenv.
Testing Simple Flask Server
I created a small hello Flask server in experimentation with various web micro-frameworks. You can use this to test out your Python environment. (Note these instructions are for *nix systems running GNU bash)
mkdir -p hello_flask && cd hello_flaskcat <<-PKG_MANIFEST > requirements.txt
Flask >= 0.10.1
itsdangerous >= 0.24
Jinja2 >= 2.8
MarkupSafe >= 0.23
Werkzeug >= 0.11.4
PKG_MANIFESTcat <<-PYTHON_VERSION > .python-version
2.7.11
PYTHON_VERSIONcat <<-SOURCE_CODE > app.py
#!/usr/bin/env python
from flask import Flask
app = Flask(__name__)

@app.route('/')
@app.route('/hello')  # this route is not working
@app.route('/hello/')
def hello_world():
    return 'Hello World!\n'

@app.route('/hello/<username>') # dynamic route
def hello_user(username):
    # show the user profile for that user
    return 'Why Hello %s!\n' % username

if __name__ == '__main__':
    app.run(host='0.0.0.0')  # open for everyone
SOURCE_CODE
One you create these three files, you can run the following:
# install project python version
pyenv install $(cat .python-version)
pyenv local# create virtualenv
pyenv virtualenv hello-flask# activate virtualenv
pyenv local hello-flask
pip install -r requirements.txt# run the server
./app.py
Wrapping Up
There you have it, a way to consistently manage Python versions per user and project (local directory) level, and a small Python demonstration on how to create a small web service with Flask.
I threw in using the pyenv-virtualenv plugin, which is bundled with PyEnv installation. VirtualEnv is a way you can install packages separate from your main environment, on a project by project level. This plug-in will automate running activate and deactivate process when you switch into or out of the project directory.

