ExternalDNS with AKS & Azure DNS
ExternalDNS with kubelet identity to access to Azure DNS
After deploying a public facing web application on Kubernetes, you need to update DNS records so that traffic can reach the server. ExternalDNS can automate this process during deployment stage of the web application, so there is no need for extra configuration outside of Kubernetes.
This tutorial demonstrates how to setup and configure this on Azure Kubernetes Services (AKS) and Azure DNS zones.
📔 NOTE: This was tested on following below and may not work if versions are significantly different.* Kubernetes API v1.22
* kubectl v1.24
* az v2.36.0
* helm v3.82
* ExternalDNS v0.11.0
Knowledge Requirements
This tutorial requires basic understanding of DNS, managing cloud platforms like Azure, and one’s way around container orchestration with Kubernetes.
Using Azure CLI (az command) to provision cloud resources, and kubectl to provision Kubernetes services. This requires using KUBECONFIG env var to configure access.
Tool requirements
The following tools are needed:
- Azure CLI (
az)v2.36.0(Python3.10.4) - Kubernetes client (
kubectl)v1.24or higher - Helm
v3.8.2or higher (optional for the ingress)
All client scripts were tested using using bash v5.1, (other POSIX shells should work) with Kubernetes v1.22.6.
Setup
Use these environment variables and adjust as needed:
The DOMAIN_NAME will need to change to a domain that is under your control. The domain example.com will be used as an example domain for this tutorial.
Azure DNS zone
If you do not yet have a Azure DNS zone available, you can create one through these steps:
This should output a list similar to this:
ns1-06.azure-dns.com.
ns2-06.azure-dns.net.
ns3-06.azure-dns.org.
ns4-06.azure-dns.info.
The variable $NS_LIST will be used later in verification stages.
Update domain registrar name servers
In this tutorial example.com is used as an example domain. If you own a domain that was registered with a third-party domain registrar, you should point your domain’s name servers to the values printed from the above list.
Create a cluster
The Kubernetes cluster can deploy containers across a several virtual machines called nodes. These are managed as a set and called a node pool. On Azure, a node pool is implemented as virtual machine scale set (VMSS).
Create Azure Kubernetes Service cluster
You can create the resource group, the Azure Kubernetes Service cluster, as well as local cluster operator access through set by the KUBECONFIG with the following commands.
Create namespaces
A common practice is to install applications into separate namespaces.
Personally, I like to put cluster-wide platforms such as an ingress controller and ExternalDNS into a kube-addons namespace, and applications into their own unique namespace.
Whatever namespace you chose, here’s how you can create all the namespaces that are used in this project, with the following commands:
Granting access using the Kubelet identity method
In this method, access to Azure DNS will be granted to the kubelet identity. This is a managed identity that is added to all of the nodes in the node pool. A managed identity is simply a service principal, whose life cycle (creation, renewal, destruction) is managed on your behalf.
A kubelet identity can be created before the cluster and added with the --assign-kubelet-identity flag, or created automatically. For this tutorial, the kubelet identity that came with the cluster on creation will be used.
⚠️ WARNING: This access method grants ALL containers running in the node pool to access the Azure DNS zone, not just the ExternalDNS container. This is suitable for disposable test environments. This is not recommended for production systems.
ExternalDNS Secret
Create and deploy a configuration that tells ExternalDNS to use the kubelet identity.
This configuration simply tells ExternalDNS to use the kubelet identity, or the managed identity that comes with the cluster’s node pool.
Deploy ExternalDNS
Save the following below as externaldns.yaml.
This manifest will have the necessary components to deploy ExternalDNS on a single pod.
Before deploying, edit the file and replace $DOMAIN_NAME with the domain name, such as example.com, and also replace $EXTERNALDNS_NS with the desired namespace, such as kube-addons.
The variable $AZ_DNS_RESOURCE_GROUP needs to be changed to the DNS resource group, for example: my-dns-group.
When ready, you can deploy this with:
kubectl create --filename externaldns.yaml \
  --namespace ${EXTERNALDNS_NS:-"default"}
You can look at the objects deployed with:
kubectl get all --namespace ${EXTERNALDNS_NS:-"default"}View logs
You should peek at the logs to see the health and success of the ExternalDNS deployment.
POD_NAME=$(kubectl get pods \
  --selector "app.kubernetes.io/name=external-dns" \
  --namespace ${EXTERNALDNS_NS:-"default"} --output name)kubectl logs $POD_NAME --namespace ${EXTERNALDNS_NS:-"default"}
If things are not working, you will see something like:
time="2022-05-26T04:57:34Z" level=error msg="dns.ZonesClient#ListByResourceGroup: Failure responding to request: StatusCode=403 -- Original Error: autorest/azure: Service returned an error. Status=403 Code=\"AuthorizationFailed\" Message=\"The client '7af5b0ee-5c59-4285-b8b1-47ee6ee65aee' with object id '7af5b0ee-5c59-4285-b8b1-47ee6ee65aee' does not have authorization to perform action 'Microsoft.Network/dnsZones/read' over scope '/subscriptions/11122233-1112-1112-1112-111222333111/resourceGroups/my-dns-group/providers/Microsoft.Network' or the scope is invalid. If access was recently granted, please refresh your credentials.\""When things are working, you should see something like this:
time="2022-05-26T05:10:07Z" level=info msg="Instantiating new Kubernetes client"
time="2022-05-26T05:10:07Z" level=info msg="Using inCluster-config based on serviceaccount-token"
time="2022-05-26T05:10:07Z" level=info msg="Created Kubernetes client https://10.0.0.1:443"
time="2022-05-26T05:10:07Z" level=info msg="Using managed identity extension to retrieve access token for Azure API."
time="2022-05-26T05:10:07Z" level=info msg="Resolving to system assigned identity."
Verify with a service object
When using a service as an endpoint for your web application, you can have ExternalDNS update DNS records so that users can reach the endpoint. ExternalDNS will scan for annotations in the service object. Here’s how you can set DNS records using a service object.
Save the manifest below as nginx.yaml
Change $DOMAIN_NAME to a domain, such as example.com. When ready to deploy the ingress, run:
kubectl create --filename nginx.yaml \
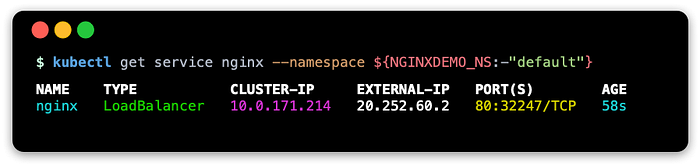
--namespace ${NGINXDEMO_NS:-"default"}Check to see if the service has an external address (this may take some seconds):
kubectl get service --namespace ${NGINXDEMO_NS:-"default"}You may see something similar to this:
Service: verify record changes on Azure DNS zone
Check if the records were updated in the zone:
az network dns record-set a list \
  --resource-group ${AZ_DNS_RESOURCE_GROUP} \
  --zone-name ${DOMAIN_NAME} \
  --query "[?fqdn=='nginx.$DOMAIN_NAME.']" \
  --output yaml
This should show something like:

Service: query using dig
Using list of name servers from before, check that the record is resolved from an Azure DNS nameserver, and then check that the record is resolved using the default name server configured for your system:
NAME_SERVER=$(head -1 <<< $NS_LIST)dig +short @$NAME_SERVER nginx.$DOMAIN_NAME
dig +short nginx.$DOMAIN_NAME
Service: test with curl
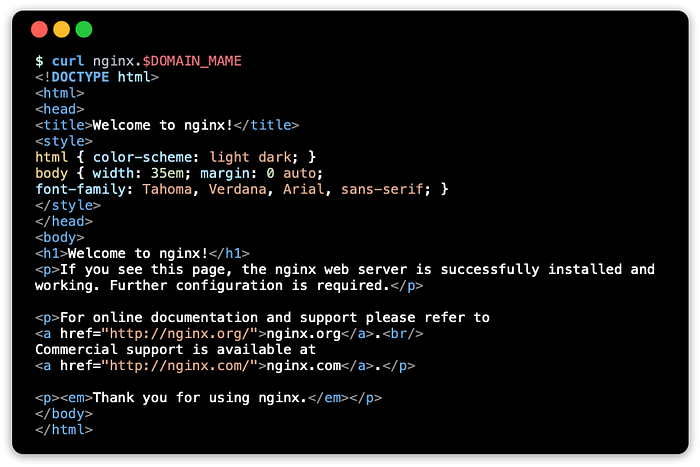
Use curl to get a response using the FQDN:
curl nginx.$DOMAIN_NAMEThis should show something like:
Verify with an ingress object
An ingress controller is a reverse-proxy load balancer that will route traffic to your services based on the FQDN (fully qualified domain name) value you set for the host name key. ExternalDNS monitors ingress changes, and will fetch the host name, and update corresponding DNS records.
⚠️ NOTE: This tutorial creates two endpoints for the same web server for demonstration purposes. This is unnecessary, as one endpoint will do, so if you are using an ingress resource, you can change the type of the service to ClusterIP.
Ingress manifest
Save the following below as ingress.yaml:
Change $DOMAIN_NAME to a domain, such as example.com
Ingress controller: ingress-nginx
In order for this to work, you will need to install an ingress controller on the Kubernetes cluster. An easy way to do this is to use Helm to install the ingress controller.
helm repo add ingress-nginx \
  https://kubernetes.github.io/ingress-nginxhelm install --namespace ${INGRESSNGINX_NS:-"default"} \
  ingress-nginx ingress-nginx/ingress-nginx
After a minute, check to see if the ingress controller has a public IP address.
kubectl get service ingress-nginx-controller \
  --namespace ${INGRESSNGINX_NS:-"default"}
This should show something like:

Deploy the ingress
When ready to deploy the ingress, run:
kubectl create --filename ingress.yaml \
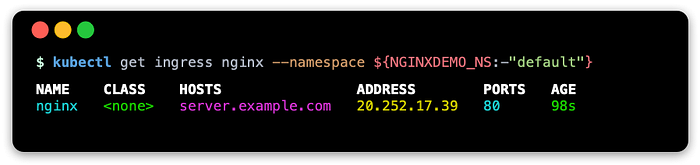
--namespace ${NGINXDEMO_NS:-"default"}Check to see if the ingress has an external address (this may take some seconds):
kubectl get ingress --namespace ${NGINXDEMO_NS:-"default"}You may see something similar to this:
Ingress: Verify record changes on Azure DNS zone
Check if the records were updated in the zone:
az network dns record-set a list \
  --resource-group ${AZ_DNS_RESOURCE_GROUP} \
  --zone-name ${DOMAIN_NAME} \
  --query "[?fqdn=='server.$DOMAIN_NAME.']" \
  --output yaml
This should show something like:

Ingress: Query using dig
Using list of name servers from before, check that the record is resolved from an Azure DNS nameserver, and then check that the record is resolved using the default name server configured for your system:
NAME_SERVER=$(head -1 <<< $NS_LIST)dig +short @$NAME_SERVER server.$DOMAIN_NAME
dig +short server.$DOMAIN_NAME
Ingress: test with curl
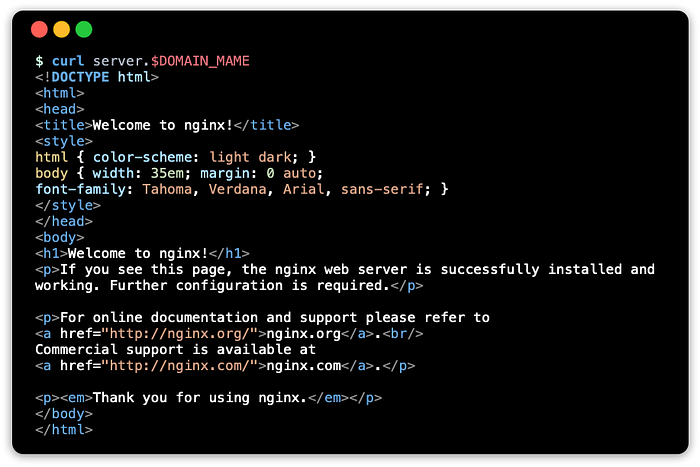
Use curl to get a response using the FQDN:
curl server.$DOMAIN_NAMEThis should show something like:
Cleaning up
The cluster and resources created from Kubernetes can be destroyed with:
az aks delete \
  --resource-group ${AZ_AKS_RESOURCE_GROUP} \
  --name ${AZ_AKS_CLUSTER_NAME}
The zone can be removed with:
az network dns zone delete \
  --resource-group ${AZ_DNS_RESOURCE_GROUP} \
  --name ${DOMAIN_NAME}
The resource groups can be deleted with:
az group delete --name ${AZ_DNS_RESOURCE_GROUP}
az group delete --name ${AZ_AKS_RESOURCE_GROUP}
Resources
These are resources I came across in making this article.
Azure Documentation
- What are managed identities for Azure resources?
- Use managed identities in Azure Kubernetes Service
- Best practices for authentication and authorization in Azure Kubernetes Service (AKS)
- Service principals with Azure Kubernetes Service (AKS)
ExternalDNS
The original documentation only covered using static credentials and partially documented managed identities (previously called managed service identities). I recently updated this to fully document managed identities and add AAD Pod Identity.
- Setting up ExternalDNS for Services on Azure (ExternalDNS project)
Conclusion
The goal of all of this fun stuff is to show ExternalDNS on AKS with Azure DNS, and walk through using az and kubectl tools to set all this up.
A common practice on Azure is to segregate resources like DNS into another resource group, and workloads (application containers running on a cluster) into another resource group.
The method to use kubelet identity, the default managed identity that is assigned to the worker nodes on AKS, is really only suitable when all containers on the cluster need the same level of access. A common use case for this is when using a private container registry like ACR (Azure Container Registry), and the containers need read access to pull down containers.
Alternatives creating a service principal and secrets file, but this is not recommended either as you have to securely deliver the secret, rotate the secret, and audit it when access, and also manage the service principal manually as well. Better solutions are the AAD Pod Identity service, and more recently in beta Workload Identity, which would allow a KSA (Kubernetes service account) to masquerade as a service principal on Azure to access resources.