ExternalDNS w. EKS and Route53 pt2
Using ExternalDNS with static credentials to access to Route53
In a previous article, I covered how to use ExternalDNS to automate updating DNS records when you deploy an application on Kubernetes. This was done by giving all the nodes on Kubernetes access to the Amazon Route 53 DNS zone. This was not desirable, as it allows anything running on the cluster to read and write records.
As an alternative, you can give access to only the ExternalDNS container by uploading a credentials file containing secrets that will provide access to the Route 53 DNS zone. This grant access to only the target service, rather than the whole cluster, but there are some gotchas (see below).
This tutorial will show how to setup ExternalDNS using static credentials on Amazon EKS using Amazon Route 53.
📔 NOTE: This was tested on following below and may not work if versions are significantly different.* Kubernetes API v1.22
* kubectl v1.24
* aws 1.24
* eksctl v0.97
* helm v3.82
* ExternalDNS v0.11.0
Dangers of using static credentials
At some point, the secrets can get compromised, and then unknown threat actors will have the secrets and unmitigated access to the service. This is not a matter of if, but a matter of when.
For this scenario the secret will need to be rotated: where the current secret is replaced with a newly generated secret, and access to the service using the old credentials are removed.
When delivering the secret to the ExternalDNS service, it should be done in a secure manner, not stored anywhere after uploading the secret.
If the cloud provider has this feature, access to the resource should be closely monitored, so that any unauthorized access generates an alert.
⚠️ This naturally requires automation to help mitigate the risk. Thus given the risk, and complexity in the automation required to mitigate the risk, this method is the least desirable method. It should only be used when no other option is available.
Previous Article
Knowledge requirements
This tutorial requires basic understanding of DNS protocol, cloud platforms like AWS, and the container orchestration platform Kubernetes.
Specifically you should know how to configure AWS profiles or default profile (aws command), configuring Kubernetes usingKUBECONFIG environment variable, and using kubectl to deploy resources.
Tool requirements

The following tools are needed for this tutorial:
- AWS CLI (
aws) v1.24.2 or higher (python 3.8 installed via pyenv tested) - Kubernetes client (
kubectl) v1.24 or higher - eksctl [optional] v0.97 or higher
- Helm [optional] v3.8.2 or higher
All client scripts were tested using using bash v5.1, (other POSIX shells should work) with Kuberntes (EKS) v1.22.6-eks-14c7a48.
About EKSctl
The eksctl tool is a simple CLI tool for creating and managing clusters on EKS. The open source tool is written in Go and uses CloudFormation stacks to provision the cluster. The tool is developed by Weaveworks and is officially support by AWS.
This tool is not explicitly required, feel free to use other commands to provision the cluster and network information. If you elect to use eksctl, with one single command you can provision the following:
- provision network infrastructure: VPCs, subnets, route tables, network ACLs, internet gateway, etc.
- provision control plane and worker nodes: EC2s with an instance profile managed by ASG.
- apply least privilege security with IAM roles and security groups
About Helm
Helm is a package manager for Kubernetes that allows you to install applications using a single command, reducing complexity that is required with kubectl and custom hand-crafted manifests..
Helm is used to install the ingress-nginx, as EKS does not come with a default ingress controller.
Setup
We’ll use some environment variables to configure the project.
Configure the above as needed. You will want to change the DOMAIN_NAME to a domain that you control. The domain example.com is used as an example throughout this tutorial.
Creating a policy
Access to Route 53 is done by creating a policy and then attaching the policy to an IAM identity (users, groups, or roles). For this tutorial, the policy will be attached to an IAM user.
Save the following below as policy.json:
Create this policy with the following command:
For the rest of this tutorial, POLICY_ARN environment variable will be used.
Route 53 DNS zone
If you do not have a current DNS Zone configured, you can create one with this:
In this tutorial example.com is used as an example domain. If you own a domain that was registered with a third-party domain registrar, you should point your domain’s name servers to the values printed from the above snippet.
Create the cluster
Provision an EKS cluster with your desired provisioning tool. If you use eksctl, you can stand up a cluster easily with:
eksctl create cluster \
  --name $EKS_CLUSTER_NAME \
  --region $EKS_CLUSTER_REGION
Create namespaces
A common practice is to install applications into separate namespaces.
Personally, I like to put cluster-wide platforms such as an ingress controller and ExternalDNS into a kube-addons namespace, and applications into their own unique namespace.
Whatever you chose, here’s how you can create all the namespaces that are used in this project, with the following commands:
Granting access using static credentials method
For this process, you will create an IAM user and attach the policy created earlier. Then using that user, create static credentials, called access keys, upload the static credentials as a Kubernetes secret. This part of the process should happen before deploying ExternalDNS.
Deploy ExternalDNS
Save the following below as externaldns.yaml.
This manifest will have the necessary components to deploy ExternalDNS on a single pod with access to the secret through a mounted volume.
First replace $DOMAIN_NAME with the domain name, such as example.com, and replace $EXTERNALDNS_NS with the desired namespace, such as externaldns or kube-addons. Replace $EKS_CLUSTER_REGION with the target region of the EKS cluster, such as us-east-2.
When ready, you can deploy this with:
kubectl create --filename externaldns.yaml \
  --namespace ${EXTERNALDNS_NS:-"default"}
Verify with a service object
For a quick demonstration that things are functioning, we can deploy an nginx web server, and use an annotation to the service object to configure the FQDN (fully qualified domain name) for the web service.
Save the manifest below as nginx.yaml:
Replace $DOMAIN_NAME with the domain name, such as example.com.
When ready to deploy, you can do so with this command:
kubectl create --filename nginx.yaml \
  --namespace ${NGINXDEMO_NS:-"default"}
Check to see if the service has full deployed the external load balancer:
kubectl get service --namespace ${NGINXDEMO_NS:-"default"}You may see something similar to this:

Service: verify record changes on Route 53 zone
Verify the Route 53 records have been updated:
This should show something like:

Service: query using dig
You can also use dig to run a query against both the Route 53 name server and the default name server:
NAME_SERVER=$(head -1 <<< $NAME_SERVERS)dig +short @$NAME_SERVER nginx.$DOMAIN_NAME
dig +short nginx.$DOMAIN_NAME
This should return one or more IP addresses that correspond to the ELB FQDN.
Service: test with curl
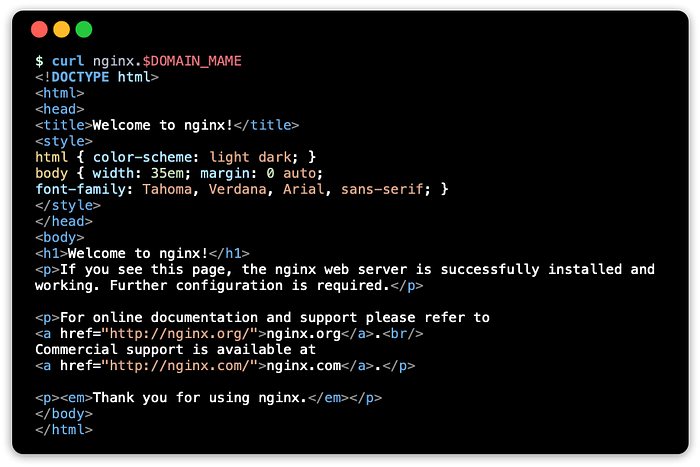
Use curl to get a response using the FQDN:
curl nginx.$DOMAIN_NAMEThis should show something like this:
Verify with an ingress object
ExternalDNS supports ingress objects as well. An ingress controller will route traffic to the appropriate backend service when it matches the value you set for the host name. On top of this, ExternalDNS will update the zone with a record for that host name.
NOTE: This tutorial creates two endpoints, a service with an external load balancer and an ingress, only for demonstration purposes to show off ExternalDNS. For practical purposes, only one endpoint is needed, so when the an ingress is used, the service type can be changed to ClusterIP.
Ingress controller: ingress-nginx
In order for this to work, you will need to install an ingress controller on the Kubernetes cluster. An easy way to do this is to use Helm to install the ingress controller.
helm repo add ingress-nginx \
  https://kubernetes.github.io/ingress-nginxhelm install --namespace ${INGRESSNGINX_NS:-"default"} \
  ingress-nginx ingress-nginx/ingress-nginx
Ingress manifest
Save the following below as ingress.yaml.
Change $DOMAIN_NAME to a domain, such as example.com. When ready to deploy the ingress, run:
kubectl create --filename ingress.yaml \
 --namespace ${NGINXDEMO_NS:-"default"}
Check to see if the ingress has an external address (this may take some seconds):
kubectl get ingress --namespace ${NGINXDEMO_NS:-"default"}You may see something similar to this:

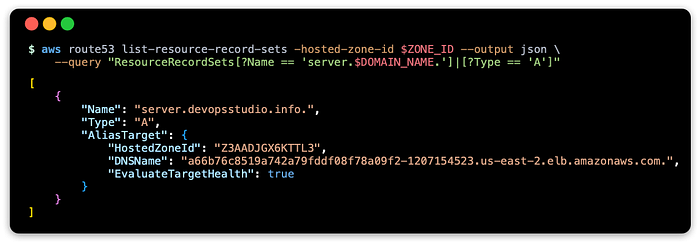
Ingress: verify record changes on Route 53 zone
Verify the Route 53 records have been updated to reflect the ingress object’s address:
This should show something like:
Ingress: query using dig
You can use dig to run a query against both the Route 53 name server and the default name server:
NAME_SERVER=$(head -1 <<< $NAME_SERVERS)dig +short @$NAME_SERVER server.$DOMAIN_NAME
dig +short server.$DOMAIN_NAME
This should return one or more IP addresses that correspond to the ELB FQDN.
Ingress: test with curl
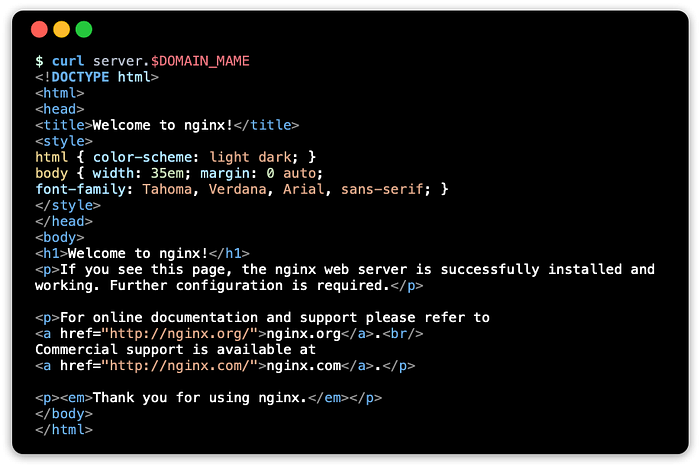
Use curl to get a response using the FQDN:
curl server.$DOMAIN_NAMEThis should show something like this:
Cleaning up
You can remove the resources allocated with the following steps below. The load balancers must be removed before destroying the EKS cluster, otherwise they will be left behind and eat up costs.
Load Balancers
Delete any load balancers that are used, as these services may not be deleted when the cluster is destroyed, and eat up costs.
kubectl delete svc/nginx -n ${NGINXDEMO_NS:-"default"}
kubectl delete ing/nginx -n ${NGINXDEMO_NS:-"default"}helm --namespace ${INGRESSNGINX_NS:-"default"} delete ingress-nginx
Kubernetes Cluster (EKS)
Now the Kubernetes cluster can be safely destroyed:
eksctl delete cluster --name $EKS_CLUSTER_NAME \
  --region $EKS_CLUSTER_REGION
Route 53 zone
If the Route 53 zone is no longer needed, delete this with:
aws route53 delete-hosted-zone --id $NODE_IDIAM User
The IAM user can be deleted after detaching the policy.
aws iam detach-user-policy --user-name "externaldns" \
  --policy-arn $POLICY_ARNaws iam delete-user --user-name "externaldns"
Policy
And last but not least, delete the policy if this will no longer be used:
aws iam delete-policy --policy-arn $POLICY_ARNResources
These are documentation links I have come across related to this tutorial.
AWS Documentation
ExternalDNS
This tutorial is based on docs I updated to the ExternalDNS project (pull request review phase)
- ExternalDNS AWS tutorial (latest)
Next Article
Secure access to Route53 at the pod level using Kubernetes service account:
Conclusion
Similar to the previous article, the goal is to demonstrate ExternalDNS on EKS with Route 53, and walk through using aws and kubectl tools.
Additionally, the goal is to expose you to identities that are configured to access a resource. In the previous article, a role identity was associated to the Kubernetes nodes (EC2 instances managed by ASG) to provide access to Route 53. In this article, a user identity is used by ExternalDNS through generated static credentials called access keys.
With these two articles you can see the trade offs between using an IAM role versus using an IAM user. With the IAM role, all containers on the cluster have access, but the secrets used behind the scenes are rotated frequently. With the IAM user, only ExternalDNS has access, but the secrets require complex automation to rotate and secure the secret.
As mentioned in the article, using static secrets should only be used a last resort when there is no other option available, such as using a cluster hosted outside of AWS. For services that need access, you can secure access to a resource using the Kubernetes identity, service account, and thus only allow designated pods to access the resource. This is done on AWS with IRSA (IAM Role for service account) using OpenID Connect provider. See the next article for more information: ExternalDNS w. EKS and Route53 pt3: Using ExternalDNS with IRSA to access Route 53.
I hope this is useful in your journey.