Deploy Kubernetes Apps w. Terraform
Using Terraform to Manage Kubernetes Resources (EKS Version)
Terraform can provision resources on Kubernetes, much in the same way you can provision cloud resources like AWS Cloud, Google Cloud, and Azure.
This article demonstrates how to use Kubernetes Provider to deploy a service (using Helm Tiller as the example) on Amazon EKS. One advantage to using Amazon EKS is that we can use the AWS provider to fetch credentials necessary access our Kubernetes cluster.
Why use Terraform?
The most obvious question would be why would you want to do this? The kubectl tool works fine and Kubernetes manifests (YAML), so why not just stick with that?
There are a few situations where you need to orchestrate provisioning of resources on both the cloud provider and Kubernetes. I encountered at least two use cases:
- Standing up an Amazon EKS cluster with some integration to AWS cloud resources installed into Kubernetes, e.g.
external-dnsfor Rout53,tillerfor helm charts, an ingress likenginx-ingressoraws-alb-ingress-controller, security withkube-iam, and so forth. - Installing an application that is configured to use provisioned resources, like S3 buckets, SNS, SQS, ECR, IAM User, etc.
Additionally, you may want to use the templating that comes with Terraform as an alternative to Helm charts.
Related Article
A while back (about 1.5 years), I wrote a similar article for doing this with GKE (Google Kubernetes Engine):
Required Tools
You will need to install and configure the following tools:
- AWS CLI needed to interact with AWS cloud resources. A profile with administrative access should be configured.
- EKSCtl (eks-cuttle or exseey-cuttle) tool to easily create an EKS cluster. [Note: this is optional should you want to eksctl to quickly create EKS cluster]
- KubeCtl (koob-cuttle), the Kubernetes client tool, to interact with EKS
- Helm to install applications on a Kubernetes cluster (Helm 2 explicitly, see below) [Note: this is needed to demonstrate the Tiller service is working]
- Terraform CLI to manage Kubernetes and AWS resources, as well as create an EKS cluster.
- Bash Shell is not strictly required, but the commands in this tutorial are tested with
bash[Note: this is default in mac OS and popular Linux distros, or msys2 with Windows].
Getting Helm 2
You can get the download links for Helm2 tarball directly from GitHub:
Download and extract the tarball, so for example, if you downloaded the tarball for Mac OS, you could run (assuming bash shell):
URL=https://get.helm.sh/helm-v2.16.1-darwin-amd64.tar.gz
cd ~/Downloads && curl -sO $URL
tar xvzf ${URL##*/}
sudo cp darwin-amd64/helm /usr/local/bin/helm2
We can test to see if it is in the path
helm2 version | cut -d\" -f2Part 0: Setup Project Area
In order to organize project files for scripts in this article, we’ll store them in eks-with-tiller directory:
export PROJECT_HOME=$HOME/projects/eks-with-tiller
mkdir -p $PROJECT_HOME && cd $PROJECT_HOME
Part I: Creating a Kubernetes Cluster
The easiest way to create an Amazon EKS cluster is with the eksctl tool. Alternatively, you can use Terraform to stand up Amazon EKS cluster as well.
The ultimate take-away form this is that you can install services and applications into Amazon EKS created by any solution using the Kubernetes Provider in conjunction with AWS provider.
Method 1: Using EKSCtl for EKS
Run the following command:
eksctl create cluster \
  --name=wonderful-unicorn \
  --kubeconfig=wonderful-unicorn-kubeconfig.yaml
Note that the region will default to the region set in your current AWS profile in $HOME/.aws/config. For this tutorial, as an example, we’ll use us-west-2.
This process will take about 20 minutes. Once completed, test the results:
# point KUBECONFIG to only our cluster
export KUBECONFIG=$PROJECT_HOME/wonderful-unicorn-kubeconfig.yaml# test kubectl works on new kubernetes cluster
kubectl get all --all-namespaces
Method 2: Using Terraform for EKS
To get started, we’ll create a small terraform file to describe our cluster:
cat <<-CLUSTER_EOF > eks_cluster.tf
variable region {}
variable eks_cluster_name {}                                               module "eks-cluster" {
  source           = "github.com/darkn3rd/eks-basic?ref=v0.0.1"
  region           = var.region
  eks_cluster_name = var.eks_cluster_name
}
CLUSTER_EOF
Next we’ll set some environment variables:
export TF_VAR_eks_cluster_name=wonderful_unicorn
export TF_VAR_region=us-west-2
Now we initialize our environment and apply the script:
terraform init
terraform apply
This will take roughly 20 minutes, and afterward, we can test that the cluster works:
# point KUBECONFIG to only our cluster
export KUBECONFIG=$PROJECT_HOME/kubeconfig_wonderful-unicorn# test kubectl works on new kubernetes cluster
kubectl get all --all-namespaces
Part 2: Tiller Service Example
Helm is the most popular package solution for Kubernetes and requires the Tiller service to install packages (at least with versions before Helm3).
Setup
We want to create the structure we’ll use for these code files that looks like this:
my_modules/
└── tiller/
    ├── crb.tf
    ├── deploy.tf
    ├── provider.tf
    ├── sa.tf
    ├── svc.tf
    └── variables.tf
With Bash shell, you can create this using the following commands:
mkdir -p $PROJECT_HOME/my_modules/tiller/
pushd $PROJECT_HOME/my_modules/tiller/
touch ./{provider.tf,variables.tf,sa.tf,crb.tf,deploy.tf,svc.tf}
popd
Variables
First we’ll edit the tiller/variables.tf that contains the variables we’ll use in this module.
tiller/variables.tfAWS and Kubernetes Providers
Edit tiller/provider.tf with the following contents.
tiller/provider.tfThis script has two providers:
- AWS provider: used to get the credentials from Amazon EKS data sources.
- Kubernetes Provider: used to change state of resources in Kubernetes.
Tiller Service Account Manifest
Edit tiller/sa.tf with the following contents.
tiller/sa.tfTiller Cluster Role Binding Manifest
Edit tiller/crb.tf with the following contents.
tiller/crb.tfTiller Deployment Manifest
Edit tiller/deploy.tf with the following contents.
tiller/deploy.tfTiller Service Manifest
Edit tiller/svc.tf with the following contents.
As part of the Tiller setup, we create
tiller/svc.tfPart 3: Deploy the Service with Terraform
We can either use the module directly or create a terraform script that references the module.
Method 1: Directly Use the Module
We can navigate to the module and initialize the dependencies with:
cd $PROJECT_HOME/my_modules/tiller && terraform initNow we can run it directly by supplying the name of our EKS cluster and region (using us-west-2 as an example):
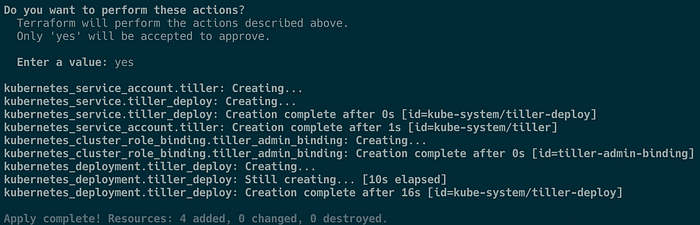
terraform apply \
  -var eks_cluster_name=wonderful-unicorn
  -var region=us-west-2
In the prompt, type yes, and you should see something like this:
Method 2: Directly Use the Module
Instead of running the code directly from the module, we create a Terraform script that references the module:
cd $PROJECT_HOME# create k8s_addons.tf
cat <<-K8SADDONS > k8s_addons.tf
module "tiller_install" {
  source           = "~/projects/eks-with-tiller/my_modules/tiller"
  region           = "us-west-2
  eks_cluster_name = "wonderful-unicorn"
}
K8SADDONS
Change the values above to whatever is appropriate for the region. After, we can initialize the module dependencies and run this script:
terraform init
terraform apply -target=tiller_install
Part 4: Testing the Deployed Service
Testing the Tiller Service
If you have Helm 2 installed already, you can install a Helm chart package.
For example, you can install an Spinnaker Continuous Delivery solution (this takes about 4–8 minutes to install) with this:
helm2 install stable/spinnakerexport DECK_POD=$(kubectl get pods \
  --namespace default \
  -l "cluster=spin-deck" \
  -o jsonpath="{.items[0].metadata.name}")export GATE_POD=$(kubectl get pods \
  --namespace default \
  -l "cluster=spin-gate" \
  -o jsonpath="{.items[0].metadata.name}"
)kubectl port-forward --namespace default $GATE_POD 8084 &kubectl port-forward --namespace default $DECK_POD 9000 &
Then try http://localhost:9000:

Part 5: Cleanup Resources
Delete Installed Chart
For any helm charts, you can delete it with, with helm delete with the name that was auto-generated:
helm2 delete $(helm2 ls | grep spinnaker | cut -f1)Remove the Tiller Service
We can remove Tiller with Terraform
terraform destroy -var cluster=wonderful-unicornDestroy the EKS Cluster
The EKS cluster we created can be destroyed with the same tool used to create the cluster.
If you created the cluster with eksctl, you can run the following:
eksctl delete cluster --name wonderful-unicornIf you used Terraform, you can do the following:
cd $PROJECT_HOME
terraform destroy
Conclusion
I hope this is useful tool to add for Terraform and Kubernetes journeys where they may intersect. This particular article leverages uses Amazon EKS, but really you could use other Kubernetes implementations provided that there is a data source to get the credentials to manage the cluster. Otherwise, you need to supply the credentials in another method, such as a kubeconfig file.
Before I leave, one quick mention, is a neat tool called k2tf (https://github.com/sl1pm4t/k2tf) which can convert existing Kubernetes manifests to Terraform equivalents. Sometimes, Terraform documentation may not be all that clear, especially with scarce examples, so the k2tf tool can help you get started.
Should you wish to use Terraform as an alternative templating system to Helm, you could extract out the values with either helm install <package> --dry-run --debug or helm template <path>. This will show the final rendered Kubernetes manifests, which you could then quickly convert with k2tf.
Update
I added material for standing up a cluster completely in Terraform at the request of users from Reddit. Thanks for the input.